TRANS-FORM: Week-1
- Nitika Jain
- Mar 5, 2021
- 7 min read

Updated: Mar 27, 2021
DAY - 1: SYNTHETIC
MATERIAL USED
Nylon Rope
Plastic Water Hose
PVC Electrical Conduit
Sunboard
Thermocol
Acrylic Sheet
Plastic Mesh
TOOLS USED

PVC CONDUIT


I used the hacksaw to make half cuts in the pipe. And noticed that it was now flexible so bent it a little.


I used the hacksaw to make half cuts in the pipe. Then I cut alternate rings and inserted two separate rings in the middle one.


I used a hacksaw to first make the cuts. Then using a hairdryer, I heated end strips. This allowed me to remold the plastic. So I bent them towards the opposite side.


I used a hacksaw to make the slits. Then I inserted both of them into one another.


I used a hacksaw to make the slits. Then I used the hair dryer to heat them so that they could bend and make a flower.
PLASTIC WATER HOSE


I used scissors to make the half-cuts. Then I bent the pipe and interlocked the ends together.


I used scissors to slice out diagonal pieces. Then I inserted them into one another. These are 2 different forms using the same technique.


I used scissors to slice out diagonal pieces. Then I burnt one end pinched it. I had made 7 such pieces to make a form. But while I was working on my other material they fell off the balcony.


I used scissors to cut rings. Then I made a slit in one of the rings and wrapped it around the other. After that I burnt the open ends which melted and got glued after cooling.
(Salvador Dali inspired)


I used scissors to cut rings. Then I made a slit in one of the rings and burnt the whole strip and twisted. To make an enclosed form I burnt the open ends which melted and got glued after cooling. Also, there is a ring in the center.
NYLON ROPE


I unwind the coiled rope and burnt its fibers.


I unwind the coiled rope. Then separated all the fibers and burnt them from one end.


I unwind the coiled rope from the middle. Used hairdryer on the strands and noticed that the fibers got straightened. Earlier they had curls.


I unwind the coiled rope and burnt it from the middle. The rope doesn’t bend now. It has become stiff like a stick.
THERMOCOL


Burnt the block of thermocol with a stick that had on fire.


With a hot satte stick, I created these patterns.
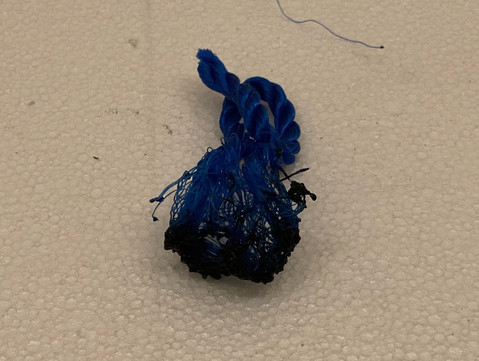
PLASTIC MOSQUITO MESH


Crumbles the mesh and burned on one end. Then pinched the other end and burned again.
ACRYLIC SHEET


I struggled a lot while cutting a piece of the sheet. I used a hacksaw and an x-acto knife. I burnt the sheet thrice and using a pair of scissors made these extrusions.
FAILURES


REFLECTION & REALISATIONS
I learned that hard and stiff materials like PVC can be made flexible by making cuts at appropriate places.
Water hose on melting acts like an adhesive.
Plastic mesh and nylon rope strands on burning shrinks and sticks together. This is because the plastic melts and cools down very fast.
Acrylic sheet leaves black powder on the surface from where it is burnt.
When we burn something, the black flames of the fire source make the object black.
DAY - 2: ALUMINUM
MATERIAL USED
Soft Wire
Hard Wire
Thin Wire
Thin Sheet
Thick Sheet
Square Pipe Section
Circular Pipe Section
Steel Mesh
TOOLS USED
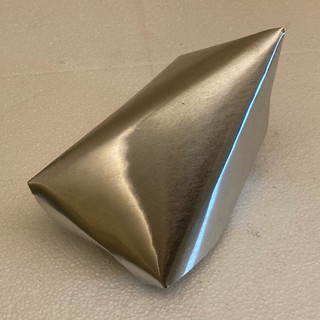
ALUMINUM SHEETS


I used a pair of scissors to cut out a piece from the aluminum sheet. Then sliced the edges finely. This automatically created curls.


I used a pair of scissors to cut out a piece from the aluminum sheet. Then sliced the edges. This automatically created curls.


I used my hands to bend the edges.


I used the nose plier to bend the edges. It has dents and looks unfinished. While the one above looks smoother.


I used a nail and a hammer to pierce the thick sheet.


I used a nail and a hammer to emboss on the thick sheet.
MOSQUITO MESH


I unweave the mesh wires. And made a tree out of these wires.


I used the nose plier to bend the edges of the 3 square pieces. And made a flower.
ALUMINUM ROUND PIPE


I used the hacksaw to make cuts. Then I used the nose plier to bend it.
While I was cutting, it kept on breaking due to the vibration caused by the to and fro motion of the hacksaw. This is because the pipe is very thin.


I burnt one of the ends to make it soft. Then hammered it to make it flat. I was in the process of making a screwdriver from this but I was running short of time. I will definitely complete the screwdriver.
ALUMINUM SQUARE PIPE


I used the hacksaw to make cuts. Then I used the nose plier to bend it. I made 3 cuts on each side of the pipe. This way it is extruded on all 4 sides.


I used the hacksaw to make cuts. Then I used the nose plier to bend it. Using the hacksaw vertically was very difficult. I had to take help from my father.
THIN SOFT WIRE


Made some figurative things using my fingers and an abstract.
THIN HARDWIRE

Burned one end. Tried to hammer it but it didn’t change its shape.
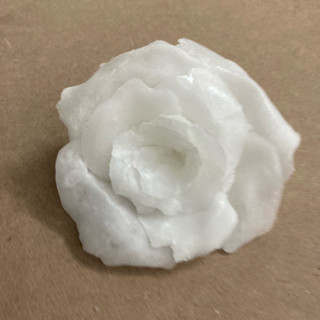
ALUMINUM FOIL

I used the nose plier’s grooves to emboss the foil.

I burned the foil and it gave this cloth-like texture.


I used my fingers to make the creased lines. And then I pinched it to give a fan-like look.


I crushed the foil and made a flower-like composition.
FAILURES


REFLECTION & REALISATIONS
The level of malleability in a metal decides how flexible it can be.
Aluminum is very soft as it can be cut easily with a blade or a hacksaw.
Burning doesn't affect aluminum, it only turns it black.
It is easy to cut the steel mesh with a pair of scissors if you cut it along the intersections in it.
I realized that cutting the square aluminum pipe at an angle of 45 degrees with a hacksaw is more efficient than cutting it at a 0-degree angle.
DAY - 3: NATURAL
TODAY I WAS SO ENGAGED WITH THE MATERIAL THAT AT THE END OF THE DAY I HAD NOTHING TO PRESENT. I EXPLORED ALL THE MATERIALS FOR THE WHOLE DAY.
MATERIAL USED
Jute Rope
Bamboo
Coir
Cotton Cord
MDF Board
Corrugated Sheet
TOOLS USED
BAMBOO STICK

I started by peeling off the fibers of the bamboo stick.


I soaked them in water. Then tried to beat it but it didn’t work. It was too hard to break.


I boiled it for 20 minutes on maximum flame. I observed a drastic change in color. The color became dark brown while it boiled. And when it was out and dry, the color became dull.


Baking the boiled bamboo gave me the most exciting results. The dull bamboo came out with a shiny, smooth surface. Also, the sound was crisp as I dropped it. Bamboos treated differently sounded differently.


I burned the boiled bamboo stick. The burnt texture looks amazing. The black powder can be removed after washing. This piece gave a beautiful smell of burnt wood. Dilli Haat came to my mind when I smelled it.


Tried half-cut on bamboo.
FLEXIBLE MATERIAL

Boiled together jute rope, coconut coir and cotton cord.
COIR


Burned the coir. Interestingly, only the fibers caught fire. When I kept it for a longer duration, then the rope started to get black.


Made this using elfy and coir. It took me 2 hours as I was being careful of the elfy and using a nose plier to hold it in position.
COTTON CORD

Burned it. It easily caught fire and then I had to blow it off to stop the fire. This was not the case in coir because only the loose hairy fibers would burn and then it used to put out of fire automatically.
JUTE ROPE


Used fevi bond to make it stiff. I also have its burning process but as a video. (Check out the blog)
COTTON


Burned it and it turned black. The burning of cotton is mind-blowing to watch. (video on the blog)
FAILURES


Boiling was a fail because I wanted to smash it down to make a pulp. Ultimately I was trying to make paper out of it. But then it did not break.
I have added the realizations with the exploration.
DAY - 4: COMPOSITE
MATERIAL USED
Wax
Resin
Biscuit Wrappers
Chips Packets
Vegetables
TOOLS USED
WAX


I heated the wax on the stove and poured it on a packet of chips. When I was pouring it layer by layer, I realized that it was not staying there. This was because the wax was way too hot to settle on top of the previous layer. So I waited for it to almost freeze again. When I was just about to become solid. I poured the whole thing on the packet and surprisingly it worked.


I heated the wax on the stove and poured it into a bowl. The bowl was kept on a steel plate to collect the excess wax. I used the same technique that I used earlier (waiting for the wax to just become solid). But again it was not staying. This time the reason was that since the bowl was upside down, it trapped the heat of the wax and couldn’t get cooler. This made the wax melt. So I removed the steel plate from underneath the bowl and swapped it with a plate with holes. That allowed the warm air to escape. And it worked.


I heated the wax in the hot pot. With a paintbrush, I made layers. Then dipped the wax plate in the hot pot and molded it.
RESIN


I used 100ml resin and 2 caps hardener. Poured the mixture in a container and kept it overnight. I have also added red color and an onion ring.


I took an empty packet of chips and spread the resin over it.


Dropped some of the mixtures on the acrylic sheet and got this amazing pattern.


The accident turned into new exploration. After getting spilled, it immediately started to solidify at that moment I scraped it off and crystals were formed. The resin mixture got heated and melted the container. This happened because I added excess of hardener.

I burned the resin crystals. The crackling sound was heard while it was getting black.
Mixing the resin and hardener and pouring in the mold.
Making different patterns with think resin.
Playing with the resin while it was getting hard.
FAILURES

Polished wood is not suitable for resin work, it absorbs resin and also does not dry. It has been 3 days and this wooden board has not dried.

The wax molding did not go as planned. It did not came out good. I had to scrape it off of the objects.


I accidentally poured an excess hardener which melted the g and everything was spilled.
Realizations and reflections are added with the images.


Comments